


Exploring How Many Fluid Ounces Are In A Water Bottle
Water bottles vary in size, but typically contain 16.9 fluid ounces, making them a popular choice for hydration on the go. Size matters when it comes to staying properly hydrated throughout the day, and understanding how many fluid ounces are in a water bottle can help you meet your daily water intake goals. Whether you prefer a reusable bottle or a disposable one, knowing the volume of water it holds is key to ensuring you stay hydrated wherever you go. Let’s dive into the world of water bottle sizes and how they can impact your daily hydration routine.

How Many Fluid Ounces Are in a Water Bottle
Welcome, young explorers! Have you ever wondered how much water you can drink from a water bottle? Well, today we are going to dive into the world of fluid ounces and unravel the mystery of how many fluid ounces are in a water bottle. So, grab your magnifying glass and let’s begin our adventure!
Understanding Fluid Ounces
Before we talk about water bottles, let’s first understand what fluid ounces are. A fluid ounce is a unit of volume used to measure liquids. It helps us know how much liquid something can hold, like water, juice, or milk. Think of it as a special potion that tells us how much liquid is inside a container.
When we talk about fluid ounces in a water bottle, we are trying to figure out how much water we can carry with us wherever we go. It’s like having a magical potion that keeps us hydrated and healthy!
Types of Water Bottles
Water bottles come in all shapes and sizes, just like the cups and bowls in your kitchen cabinet. There are small water bottles that fit in your lunchbox, big water bottles for sports practice, and even reusable water bottles that help protect our planet. Each type of water bottle can hold a different amount of liquid, measured in fluid ounces.
Small Water Bottles
Small water bottles, also known as mini water bottles, are usually around 8 to 12 fluid ounces. These are perfect for carrying a quick sip of water with you on a short trip or to school. They are like the tiny fairies of the water bottle world, small yet magical!
Medium-Sized Water Bottles
Medium-sized water bottles are a bit bigger and can hold between 16 to 24 fluid ounces. These are great for activities like hiking or playing in the park when you need a bit more hydration to keep you going. They are like the friendly elves, always ready to help you stay refreshed!
Large Water Bottles
Large water bottles are the giants of the water bottle kingdom, holding 32 fluid ounces or more. These bottles are perfect for long trips, sports games, or hanging out with friends at the beach. They are like the powerful wizards, keeping you hydrated through any adventure!
Choosing the Right Water Bottle
Now that you know about the different sizes of water bottles, how do you choose the right one for you? It’s essential to think about where and when you’ll be using your water bottle. If you’re going to school, a small water bottle might be perfect. If you’re going on a hike, a medium-sized bottle could be a better fit. And if you’re spending the whole day outside, a large water bottle might be just what you need!
Remember, the most important thing is to stay hydrated and take care of your body. Water is like a magical elixir that keeps us strong and energetic throughout the day. So, choose a water bottle that makes it easy for you to drink enough water every day!
Congratulations, young adventurers! You’ve now discovered the secret of how many fluid ounces are in a water bottle. Whether you prefer small, medium, or large water bottles, the most crucial thing is to drink enough water every day to keep your body happy and healthy. So, grab your favorite water bottle, fill it up with refreshing water, and embark on your next exciting journey!
Stay hydrated, stay curious, and keep exploring the wonders of the world around you. Until next time, happy sipping!
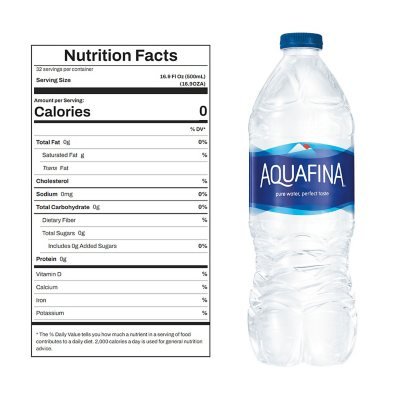
About how many cups of water are in a 16.9 FL OZ water bottle?
Frequently Asked Questions
What is the typical amount of fluid ounces in a standard water bottle?
Most standard water bottles contain 16.9 fluid ounces, which is equivalent to around 500 milliliters of water.
Are there different sizes of water bottles available based on fluid ounces?
Yes, you can find water bottles in various sizes, ranging from small sizes like 8 ounces to larger bottles that can hold up to 32 ounces of liquid.
How do I determine the number of fluid ounces in a water bottle if it’s not labeled?
If the water bottle is not labeled with the fluid ounces, you can use a measuring cup or a kitchen scale to measure the amount of liquid it can hold and convert it to fluid ounces.
Can reusable water bottles also hold the same amount of fluid ounces as disposable ones?
Reusable water bottles come in different sizes, so the amount of fluid ounces they can hold may vary. However, many reusable water bottles are designed to hold similar volumes as standard disposable water bottles.
Final Thoughts
In conclusion, it is important to know how many fluid ounces are in a water bottle to stay hydrated throughout the day. Standard water bottles typically hold 16.9 fluid ounces, providing an adequate amount of water for daily consumption. By being aware of the volume of water in each bottle, individuals can track their intake easily. Remember, ensuring you are drinking enough water each day is essential for overall health and well-being. So, grab that water bottle and stay hydrated with 16.9 fluid ounces at your disposal.

Essential Guide: How To Care For Baby Mice
Taking care of baby mice is a delicate task that requires attention and compassion. To ensure their well-being, it’s crucial to provide them with the right environment and nourishment. Baby mice need warmth, gentle handling, and a proper diet to thrive. By understanding how to take care of baby mice, you can help these tiny creatures grow into healthy adults. Join us as we explore the essential steps to nurture these adorable little beings.

How to Take Care of Baby Mice
Introduction
So, you’ve found yourself taking care of some cute baby mice, and you want to make sure they grow up healthy and happy. Baby mice, also known as pinkies or pups, require special care and attention to thrive. In this comprehensive guide, we will walk you through everything you need to know about taking care of these tiny, delicate creatures.
Setting Up Their Home
Before bringing baby mice into your home, it’s important to set up a warm and safe environment for them. A small plastic or glass aquarium with a secure lid works best as a temporary home for baby mice. Line the bottom of the tank with soft, clean bedding such as paper towels or shredded paper to keep them cozy.
Temperature Control
Baby mice are sensitive to temperature, so it’s crucial to keep their environment warm. Maintain a temperature of around 75-80°F (24-27°C) in their enclosure to ensure they stay comfortable and healthy. You can use a heat lamp or a heating pad placed under one side of the tank to create a warm spot for them to snuggle up to.
Lighting and Noise
Mice are nocturnal creatures, so it’s best to keep their living area in a quiet and dimly lit room during the day to allow them to rest. Avoid sudden loud noises or bright lights that can startle or stress out the baby mice.
Feeding Schedule
Proper nutrition is essential for the growth and development of baby mice. If you are taking care of orphaned or abandoned pups, you may need to hand-feed them using a small syringe or dropper. A specialized formula for rodent babies can be obtained from a pet store or veterinarian.
Frequency of Feeding
Baby mice need to be fed every 2-3 hours, including during the night, as they have tiny stomachs that empty quickly. Make sure the formula is at room temperature before feeding and only offer small amounts at a time to prevent overfeeding, which can lead to health issues.
Transitioning to Solid Food
As the baby mice grow, you can start introducing solid food into their diet. Soft foods like oats, fruits, and vegetables can be offered to them once they are about two weeks old. Make sure to provide fresh water in a shallow dish for them to drink from.
Handling and Socialization
It’s important to handle baby mice gently and with care to prevent injuries and stress. Slowly introduce handling by picking them up for short periods a few times a day to help them get used to human interaction. This will help them become more social and comfortable around people as they grow older.
Creating Bonding Time
Spending time with baby mice is crucial for their social development. Sit near their cage and talk to them softly to get them used to your voice. Offering them small treats like sunflower seeds or mealworms can also help build trust and create a positive association with humans.
Playtime and Enrichment
Baby mice are curious and active creatures, so providing them with toys and items to explore can help keep them engaged and stimulated. Simple items like toilet paper rolls, cardboard tubes, and small climbing structures can offer entertainment and enrichment for the baby mice.
Health and Wellness
Monitoring the health and wellness of baby mice is essential to ensure they are thriving and free from illness. Keep an eye out for any signs of distress, such as lethargy, loss of appetite, or difficulty breathing, and consult a veterinarian if you notice any concerning symptoms.
Cleaning and Hygiene
Maintaining a clean environment is crucial for the health of baby mice. Regularly clean their enclosure by removing any uneaten food, soiled bedding, and droppings to prevent the buildup of bacteria and odors. Replace the bedding at least once a week and sanitize the tank with a mild detergent.
Veterinary Care
If you notice any unusual behavior or symptoms in the baby mice, it’s important to seek veterinary care promptly. A veterinarian experienced in treating small animals like mice can provide proper diagnosis and treatment for any health issues that may arise.
Taking care of baby mice requires patience, attention to detail, and a lot of love. By providing them with a warm, safe environment, nutritious food, gentle handling, and regular health check-ups, you can ensure that these tiny creatures grow up healthy and happy. Remember, each baby mouse is unique, so observing their behavior and adapting your care routine accordingly is key to their well-being. Enjoy the journey of watching these adorable creatures grow and thrive under your care!
How to Care for Baby Mice
Frequently Asked Questions
What should I feed baby mice?
Baby mice, also known as pinkie mice, should be fed a special formula designed for neonatal rodents. This formula can be purchased at pet stores or online. It’s important to feed them every few hours, as they have high energy needs for growth and development.
How often should I clean the baby mice’s cage?
It is essential to keep the baby mice’s cage clean to prevent health issues. Clean the cage at least once a day, removing any soiled bedding and food remnants. Make sure to replace the bedding with fresh material to keep the environment hygienic.
How do I provide warmth for baby mice?
Baby mice are unable to regulate their body temperature, so they require a warm environment. Use a heating pad or a heat lamp placed at one end of their enclosure to create a gentle warmth for them. It’s crucial to monitor the temperature regularly to ensure it stays within a safe range.
Final Thoughts
Taking care of baby mice involves providing warmth, proper nutrition, and gentle handling. Keep them in a cozy environment with clean bedding and ensure they are fed a diet suitable for their age. It’s important to monitor their growth and development closely to ensure they are healthy and thriving. By following these guidelines on how to take care of baby mice, you can help them grow into strong and healthy adults.

Discover How Tall Is Maverick Baker – In-Depth Analysis
Maverick Baker stands at an impressive height of 5 feet 10 inches.
Curiosity often strikes about how tall Maverick Baker is, and today we delve into this intriguing question. As an internet sensation and established personality, his height remains a topic of interest among fans worldwide.
Join us as we explore the dimensions of this talented young influencer and uncover the truth behind ‘How tall is Maverick Baker.’ Get ready for an insightful journey into the world of Maverick Baker’s stature.

Unveiling the Height of Maverick Baker
Have you ever wondered how tall Maverick Baker, the popular social media personality and content creator, really is? In this article, we are going to delve into the topic of Maverick Baker’s height and explore various aspects related to this intriguing question. So, let’s embark on this exciting journey to discover the mystery behind Maverick Baker’s height!
The Basics: Who is Maverick Baker?
Before we dive into the specifics of Maverick Baker’s height, let’s first understand who Maverick Baker is. Maverick Baker is a talented TikTok star, singer, and social media influencer known for his entertaining videos, captivating songs, and vibrant personality. With millions of followers across various social media platforms, Maverick Baker has captured the hearts of fans worldwide with his unique content and creative talent.
Height Matters: How Tall is Maverick Baker?
Now, let’s address the burning question: How tall is Maverick Baker? As of the latest available information, Maverick Baker stands at approximately 5 feet and 9 inches tall. This places him in the average height range for a young adult male. However, it’s essential to note that height can vary depending on factors such as genetics, nutrition, and overall health.
The Genetics Factor
Genetics play a significant role in determining an individual’s height. Traits passed down from parents can influence how tall or short a person grows to be. In Maverick Baker’s case, his height may be influenced by his family’s genetic background, which could contribute to his current height of 5 feet 9 inches.
Health and Lifestyle
Aside from genetics, a person’s overall health and lifestyle choices can also impact their height. Proper nutrition, regular exercise, and adequate sleep are essential factors that can contribute to healthy growth and development. It is likely that Maverick Baker maintains a healthy lifestyle to support his physical well-being, which may have influenced his current height.
Height Comparisons: Maverick Baker vs. Other Celebrities
Now that we have a clearer picture of Maverick Baker’s height, let’s compare it to the heights of other well-known celebrities. While height is just one aspect of a person’s physical appearance, it can be interesting to see how different individuals measure up against each other.
Maverick Baker vs. Jacob Sartorius
Another popular social media personality, Jacob Sartorius, is known for his music and online presence. Standing at around 5 feet 7 inches tall, Jacob Sartorius is slightly shorter than Maverick Baker. Despite the height difference, both stars have garnered massive followings and achieved success in their respective fields.
Maverick Baker vs. Addison Rae
Addison Rae, a prominent TikTok star and influencer, is approximately 5 feet 6 inches tall. While Addison Rae may be shorter than Maverick Baker, she has risen to fame through her engaging content and charismatic personality. Height differences aside, both Maverick Baker and Addison Rae have made a significant impact in the world of social media.
Embracing Individuality: Height and Self-Confidence
It’s essential to remember that height is just one aspect of a person’s physical appearance and does not define their worth or capabilities. Maverick Baker, despite his height of 5 feet 9 inches, has achieved remarkable success and continues to inspire his followers with his creativity and passion. Ultimately, it’s the unique qualities and talents of an individual that truly shine through, regardless of their height.
Height is Just a Number
So, the next time you find yourself wondering about Maverick Baker’s height or comparing it to others, remember that height is simply a number. What truly matters is the impact a person makes through their actions, words, and contributions to the world. Maverick Baker’s height may be 5 feet 9 inches, but his influence and talent extend far beyond any measurement. Let’s celebrate individuality and embrace the diversity that makes each person special in their way!
As we conclude our exploration of Maverick Baker’s height, we hope this article has provided valuable insights and a deeper understanding of this fascinating topic. Remember, it’s not about how tall you are, but how you stand tall in everything you do!
Bigger brother?
Frequently Asked Questions
How tall is Maverick Baker?
Maverick Baker is approximately 5 feet 11 inches tall.
Is Maverick Baker considered tall?
Compared to the average height, Maverick Baker’s height of 5 feet 11 inches is above average for males, but not exceptionally tall.
Does Maverick Baker’s height influence his career in entertainment?
While height can sometimes play a role in certain casting decisions, it is not a defining factor in Maverick Baker’s career in entertainment. His talent and skills are more significant in determining his success.
Final Thoughts
Maverick Baker stands at an impressive height of 6 feet 3 inches. This tall stature adds to his charismatic presence on social media platforms. Fans often wonder, “How tall is Maverick Baker?” Now, the mystery is solved – he is indeed a tall figure in the world of influencers.

How Far Is Yosemite From Sequoia National Park: Distance Guide
Just a scenic drive of approximately 115 miles separates the breathtaking wonders of Yosemite and Sequoia National Parks. The journey between these two natural marvels takes you through the lush beauty of the Sierra Nevada mountains, offering a truly unforgettable experience. As you traverse the distance from Yosemite to Sequoia National Park, you’ll be immersed in the awe-inspiring landscapes and diverse wildlife that define each park. Get ready to embark on a memorable road trip where the question of ‘how far is Yosemite from Sequoia National Park’ is just the beginning of your adventure.

Exploring the Distance Between Yosemite and Sequoia National Park
Welcome, young explorers! Are you ready to embark on a thrilling journey through the wonders of nature? Today, we are going to dive into the fascinating world of two magnificent national parks in California: Yosemite and Sequoia National Park. Have you ever wondered how far these two natural wonders are from each other? Let’s unravel the mystery together!
Understanding the Geography
Yosemite National Park is located in the western Sierra Nevada of Central California, while Sequoia National Park is situated further south in the southern Sierra Nevada. These two parks are not too far from each other as the crow flies, but when it comes to driving distance, there are some adventures along the way!
Driving Distance
So, how far exactly is Yosemite from Sequoia National Park by road? The driving distance between the two parks is approximately 115 miles. However, keep in mind that the journey will take you through winding mountain roads and breathtaking landscapes, so be prepared for a scenic drive!
Exploring the Route
When planning your trip from Yosemite to Sequoia National Park, you have a few options for your route. One popular route takes you through the beautiful Sierra National Forest, offering stunning views of towering trees and crystal-clear rivers.
Route 1: Through Sierra National Forest
Starting from Yosemite, you will head south on CA-41, passing through charming towns and picturesque mountain vistas. As you continue your journey, you will enter the Sierra National Forest, where the road winds through lush forests and rugged terrain. Keep your eyes peeled for wildlife along the way!
After meandering through the forest, you will eventually reach the entrance to Sequoia National Park, where you can marvel at the majestic giant sequoia trees that the park is famous for.
Route 2: Through Kings Canyon National Park
Another option for reaching Sequoia National Park from Yosemite is to drive through Kings Canyon National Park. This route takes you on a scenic drive along the Kings River, with towering cliffs and cascading waterfalls as your companions.
As you make your way through Kings Canyon National Park, you will be treated to panoramic views of the rugged landscape and the opportunity to explore hidden gems tucked away in the wilderness.
Planning Your Adventure
Before you set off on your epic journey from Yosemite to Sequoia National Park, make sure to plan ahead and pack all the essentials for your trip. Bring plenty of water, snacks, and a camera to capture the memories along the way. Don’t forget to check the weather forecast and road conditions before you go!
Whether you choose to take the scenic route through Sierra National Forest or venture through Kings Canyon National Park, you are in for an unforgettable experience exploring the natural beauty of California’s national parks.
So, young adventurers, are you ready to pack your bags and hit the road to discover the wonders that await you at Yosemite and Sequoia National Park? Get ready for an adventure of a lifetime!
Safe travels and happy exploring!
The ULTIMATE Sequoia National Park Travel Guide
Frequently Asked Questions
How long does it take to drive from Yosemite to Sequoia National Park?
Driving distance between Yosemite National Park and Sequoia National Park is about 150 miles. The journey usually takes approximately 3.5 to 4 hours, depending on traffic conditions and the route taken. Allow some extra time for potential road closures or delays due to weather conditions.
What are the different routes to travel from Yosemite to Sequoia National Park?
There are a few routes you can take to drive from Yosemite to Sequoia National Park. One common route is to take CA-41 South from Yosemite to Fresno, then connect to CA-180 East which will take you into Sequoia National Park. Another option is to take CA-120 East out of Yosemite to US-395 South, then connect to CA-198 West which will also lead you to Sequoia National Park.
Are there any shuttle services available between Yosemite and Sequoia National Park?
There are no direct shuttle services available between Yosemite and Sequoia National Park. Visitors will need to arrange their own transportation via car or other means. Some tour companies may offer guided tours that include transportation between the two parks.
Final Thoughts
Yosemite National Park and Sequoia National Park are roughly 100 miles apart. Traveling between these two iconic parks offers a scenic journey through the diverse landscapes of California. While the distance may seem short, the route includes winding mountain roads, so be prepared for a few hours of driving. Exploring how far Yosemite is from Sequoia National Park allows visitors to experience the rich beauty of both destinations in a single trip.

Ultimate Guide: How To Update Thunderstore Easily
Updating Thunderstore is crucial to getting the latest mods for your favorite games. Here’s how to update Thunderstore without missing out on new features and improvements. Simply follow these easy steps to ensure your gaming experience stays up-to-date and enjoyable. Keeping your mods current is essential for compatibility and performance. Stay tuned for a detailed guide on how to update Thunderstore effortlessly. Let’s dive in and make sure your mod library is always fresh and ready to enhance your gameplay.

How to Update Thunderstore: A Complete Guide for Gamers
Welcome, gamers! If you love modding your games for exciting new features and experiences, you’re probably familiar with Thunderstore. Thunderstore is a popular platform where you can find a plethora of mods for your favorite games, from new characters to game-changing mechanics. In this guide, we will walk you through the process of updating Thunderstore to ensure you have access to the latest and greatest mods available. Let’s dive in!
Why Update Thunderstore?
Before we get into the nitty-gritty of updating Thunderstore, it’s essential to understand why keeping your mod manager up to date is crucial. Updating Thunderstore ensures that you have access to the latest mods, bug fixes, and security enhancements. By staying current, you can enjoy a smoother gaming experience with new features and improvements at your fingertips.
Checking for Updates
The first step in updating Thunderstore is to check if there are any available updates. Thankfully, Thunderstore makes this process easy for users. Here’s how you can check for updates:
- Launch Thunderstore on your computer.
- Look for an option that says “Check for Updates” or something similar. This option is typically found in the settings or about section of the mod manager.
- Click on the “Check for Updates” button and wait for Thunderstore to scan for any available updates.
- If an update is found, follow the on-screen instructions to download and install the latest version of Thunderstore.
Updating Thunderstore
Once you’ve confirmed that there is an update available for Thunderstore, it’s time to proceed with the update process. Follow these simple steps to update Thunderstore seamlessly:
- Click on the update prompt or button within Thunderstore to begin the update process.
- Wait for the update to download and install. This process may take a few minutes depending on your internet speed.
- Once the update is complete, restart Thunderstore to ensure that the changes take effect.
- Voila! You have successfully updated Thunderstore to the latest version.
Tips for a Smooth Update
While updating Thunderstore is generally a straightforward process, here are some tips to ensure a smooth update experience:
1. Stable Internet Connection
Make sure you have a stable internet connection before starting the update process. A reliable connection will prevent any interruptions during the download and installation.
2. Backup Your Mods
It’s always a good idea to back up your mods before updating Thunderstore. This way, you can easily restore them if anything goes wrong during the update.
3. Clear Cache
Occasionally, clearing the cache in Thunderstore can resolve update-related issues. Check the settings menu for an option to clear the cache before updating.
Congratulations! You have now learned how to update Thunderstore like a pro. By staying current with the latest versions, you can enjoy a seamless modding experience with access to all the fantastic mods available on Thunderstore. Remember to check for updates regularly to make the most of your gaming adventures. Happy modding!
We hope this guide has been helpful to you. If you have any questions or need further assistance, feel free to reach out. Happy gaming!
Thank you for reading!
Be careful modding Lethal Company..
Frequently Asked Questions
How can I update Thunderstore to the latest version?
To update Thunderstore to the latest version, you can simply visit the official Thunderstore website and download the newest release. Make sure to uninstall the current version before installing the updated one to avoid any conflicts.
Is it necessary to uninstall the old Thunderstore version before updating?
Yes, it is recommended to uninstall the old Thunderstore version before updating to the latest one. This helps in ensuring a smooth installation process and prevents any potential issues that may arise from conflicting installations.
Are there any specific steps to follow while updating Thunderstore?
When updating Thunderstore, it is important to close any running instances of the application. Uninstall the current version, download the latest release from the official website, and then follow the installation instructions provided. Once installed, you can configure any settings as needed.
Can I update Thunderstore directly from the application itself?
Thunderstore does not have an automatic update feature within the application. To update Thunderstore to the latest version, you will need to manually download the new release from the official website and go through the installation process as mentioned earlier.
Final Thoughts
Updating Thunderstore is essential for accessing the latest mods easily. To update Thunderstore, simply log in, navigate to the profile, click “Update” on the mod page, and confirm the changes. Regular updates ensure you enjoy the latest features and improvements offered by your favorite mods. Stay up-to-date by following these simple steps to update Thunderstore efficiently.

Unveiling: The Cost Of Competitive Cheerleading
Competitive cheer, surprisingly, can range from a few hundred dollars to several thousand per season. The cost varies depending on factors like team levels, competition fees, uniforms, travel expenses, and coaching. Many dedicated cheerleaders and parents wonder, “How much is competitive cheer?” Understanding the financial commitment is crucial for those considering joining or supporting this dynamic sport. Let’s delve into the breakdown of expenses and the value that competitive cheer can bring beyond the price tag. Let’s explore the world of competitive cheerleading from a fresh perspective.

How Much Is Competitive Cheer: A Detailed Look at Costs
Welcome, cheer enthusiasts! Are you considering joining the thrilling world of competitive cheerleading but wondering how much it will cost you or your family? Fear not, as we are here to break down the expenses involved in competitive cheer, from uniforms to competition fees. Let’s dive in and explore the financial aspects of this exciting sport!
The Initial Investment: Uniforms and Gear
One of the first expenses you’ll encounter when joining a competitive cheer team is purchasing your uniform and gear. Cheerleading uniforms are specially designed to be eye-catching and functional, typically consisting of a top, skirt, and matching accessories. Depending on the team and level of competition, a full cheer uniform can range from $100 to $500 or more.
In addition to the uniform, cheerleaders also need specialized shoes that provide support and flexibility for stunts and tumbling. Cheer shoes can cost between $50 and $100 per pair. Other essential gear includes bows, socks, and practice wear, which can add up to an additional $50 to $100.
Training and Coaching Fees
Competitive cheerleading requires rigorous training to perfect routines, stunts, and tumbling skills. Most cheer teams have regular practices during the week, which may be included in the overall cost of joining the team. However, some programs charge additional training fees to cover the cost of professional coaching and facility rental.
On average, monthly training fees for competitive cheerleading can range from $50 to $200, depending on the level of coaching and the number of practice hours per week. These fees ensure that cheerleaders receive proper instruction and guidance to excel in competitions.
Competition Costs
One of the most significant expenses in competitive cheerleading is competition fees. Cheer teams participate in various competitions throughout the season, where they showcase their routines and skills in front of judges and spectators. Competition fees can vary widely depending on the event’s location, prestige, and level of competition.
On average, competition fees for a single event can range from $50 to $150 per athlete. This cost typically covers entry fees, venue rental, and awards. Some competitions also charge admission fees for spectators, so families should budget for additional expenses if they plan to attend and support their cheerleader.
Travel and Accommodation
Another factor to consider in the cost of competitive cheer is travel and accommodation expenses. Many cheer teams travel to out-of-town competitions, which may require overnight stays in hotels or rental accommodations. Travel costs can quickly add up, especially if the competition is held in a distant city or state.
Families should budget for transportation costs, such as gas, airfare, or rental cars, as well as hotel accommodations and meals during the competition weekend. Planning ahead and booking travel arrangements early can help reduce costs and ensure a stress-free competition experience.
Additional Expenses
In addition to the major costs mentioned above, there are also several miscellaneous expenses associated with competitive cheerleading. These may include team membership dues, choreography fees, music licensing, and optional expenses like team fundraisers, spirit wear, and end-of-season celebrations.
It’s essential for families to communicate with their cheer program to understand all the expected expenses and plan accordingly. Some teams offer fundraising opportunities or payment plans to help offset the costs of participation. By budgeting and staying informed, families can fully enjoy the competitive cheer experience without breaking the bank.
Competitive cheerleading is an exciting and rewarding sport that requires dedication, teamwork, and financial commitment. While the costs of participating in competitive cheer can vary, it’s essential to consider all the factors involved to make an informed decision. By understanding the expenses related to uniforms, training, competitions, travel, and additional fees, families can budget effectively and support their cheerleaders in pursuing their passion.
Remember, the value of the experiences gained through competitive cheerleading often outweighs the financial investment. So, if you’re willing to put in the time, effort, and resources, competitive cheer can be a fulfilling and enriching journey for both athletes and their families!
Thank you for joining us on this financial exploration of competitive cheer. We hope this guide has shed light on the costs involved and provided valuable insights for those considering entering the exciting world of competitive cheerleading. Stay spirited and keep cheering!
COME GET READY WITH US!! *CHEER COMPETITION DISASTER!* 💜 📣
Frequently Asked Questions
What factors determine the cost of competitive cheerleading?
The cost of competitive cheerleading can vary based on several factors including but not limited to coaching fees, competition entry fees, travel expenses, uniform and accessory costs, and any additional training or camp fees.
Are there different levels of expenses in competitive cheerleading?
Yes, competitive cheerleading can have different levels of expenses depending on the competitiveness of the team, the number of competitions attended, the level of training required, and the quality of uniforms and equipment used.
How can families manage the costs associated with competitive cheerleading?
Families can manage the costs of competitive cheerleading by budgeting for expenses, seeking out sponsorship or fundraising opportunities, purchasing used or discounted gear when possible, and communicating openly with coaches or team managers about financial concerns.
Final Thoughts
In conclusion, competitive cheerleading costs vary depending on factors like location, team level, and competition fees. Costs typically include training fees, uniform expenses, travel expenses, and competition fees. On average, competitive cheerleading can range from a few hundred to a few thousand dollars per year. When considering how much competitive cheer can cost, it’s essential to budget for all potential expenses and consider any financial aid or sponsorship opportunities available. Ultimately, the cost of competitive cheer can be significant but can bring valuable experiences and opportunities for athletes.

Easy Tips: How To Soften Dried Blood On A Wound
To soften dried blood on a wound, soaking a clean cloth in warm water and gently applying it can help loosen the dried blood for easier removal. Once softened, you can carefully wipe away the blood with a clean cloth or cotton pad. Avoid using hot water, as it can further irritate the wound. It’s important to handle the wound gently to prevent any additional pain or discomfort. Remember, proper wound care is crucial for quick and effective healing.

How to Soften Dried Blood on a Wound
Introduction
Imagine you got a cut or scrape while playing outside, and now you see dried blood on your wound that seems tough to clean. Don’t worry! In this article, we will guide you on how to soften dried blood on a wound so that you can clean it gently and promote faster healing. Let’s dive in!
Understanding Dried Blood on Wounds
When you get a wound, your body’s natural response is to form a scab to protect it while it heals. This scab is made of dried blood, platelets, and other components to seal off the wound from harmful germs. Over time, the scab dries and hardens, making it challenging to clean the wound properly.
Importance of Softening Dried Blood
It’s essential to soften dried blood on a wound before cleaning it to prevent reopening the wound and causing further discomfort. Softening the dried blood can make it easier to remove gently without causing additional pain or damage to the skin around the wound.
Methods to Soften Dried Blood on a Wound
1. Warm Water Soaks
One of the simplest and most effective ways to soften dried blood on a wound is by using warm water soaks. Here’s how you can do it:
– Fill a clean basin or bowl with warm water.
– Soak a clean washcloth in the warm water.
– Gently place the soaked washcloth on the wound and let it sit for a few minutes.
– The warmth of the water will help soften the dried blood, making it easier to clean.
2. Saline Solution
Saline solution is a gentle and natural way to soften dried blood on a wound. You can create your own saline solution by mixing salt in water. Here’s how to use it:
– Mix one teaspoon of salt in a cup of warm water to create a saline solution.
– Soak a clean cotton ball or gauze in the saline solution.
– Place the soaked cotton ball or gauze on the wound and let it sit for a few minutes.
– The salt in the solution will help loosen the dried blood for easier removal.
3. Hydrogen Peroxide
Hydrogen peroxide is a common antiseptic that can also help soften dried blood on wounds. Here’s how to use it safely:
– Pour a small amount of hydrogen peroxide on a cotton ball.
– Gently dab the cotton ball on the dried blood on the wound.
– Allow the hydrogen peroxide to fizz and bubble, which can help soften the dried blood.
– Be careful not to use too much hydrogen peroxide, as it can irritate the skin.
4. Petroleum Jelly
Petroleum jelly, also known as Vaseline, can be a soothing way to soften dried blood on a wound. Here’s how to use it:
– Apply a thin layer of petroleum jelly around the dried blood on the wound.
– Let it sit for a few minutes to soften the dried blood.
– Gently wipe away the softened blood with a clean cloth or cotton ball.
– Petroleum jelly can also help protect the wound and keep it moisturized.
5. Commercial Wound Cleaners
If the dried blood on the wound is stubborn and hard to soften with home remedies, you can consider using commercial wound cleaners. These products are specifically designed to help clean and soften dried blood on wounds effectively. Make sure to follow the instructions on the product carefully for safe use.
After Softening the Dried Blood
Once you have successfully softened the dried blood on the wound, it’s important to clean the area gently with mild soap and water. Pat the wound dry with a clean towel and apply a thin layer of antibiotic ointment to protect it from infections. Finally, cover the wound with a sterile bandage to promote healing and prevent further contamination.
Softening dried blood on a wound is a crucial step in proper wound care. By using simple and safe methods like warm water soaks, saline solution, hydrogen peroxide, petroleum jelly, or commercial wound cleaners, you can make the cleaning process easier and less painful. Remember to always be gentle with your wound and seek medical attention if you notice signs of infection or if the wound does not heal properly. Take care of your wounds, and they will heal faster, allowing you to get back to your adventures in no time!
Non Adhesive Bandage
Frequently Asked Questions
How can I safely soften dried blood on a wound?
To safely soften dried blood on a wound, start by gently cleaning the area with mild soap and water. Avoid scrubbing vigorously to prevent further irritation. Then, place a warm damp cloth over the dried blood for a few minutes to help loosen it. Be sure to pat the area dry afterwards to remove any excess moisture.
Is it safe to use hydrogen peroxide to soften dried blood on a wound?
Avoid using hydrogen peroxide to soften dried blood on a wound as it can be too harsh and may delay the healing process. Stick to gentle methods like warm water soaks or saline solution to help loosen the dried blood without causing unnecessary irritation.
Can I use a saline solution to soften dried blood on a wound?
Yes, using a saline solution can be an effective and gentle way to soften dried blood on a wound. Simply mix a small amount of salt in warm water to create the solution, then gently dab it onto the affected area using a clean cloth or cotton pad. The saline solution can help hydrate the dried blood and make it easier to remove.
Final Thoughts
In conclusion, to soften dried blood on a wound, use gentle cleaning techniques such as warm water or saline solution. Gently wiping or soaking the area can help loosen the dried blood, making it easier to clean. Remember to avoid scrubbing or picking at the dried blood to prevent further irritation and promote faster healing. Prioritize gentle care and patience when dealing with dried blood on a wound for optimal healing results.

Discover Answers: Born In 1993, How Old Are You Now?
Born in 1993? You’re 28 years old now. That momentous year seems like a distant memory, yet its impact resonates in your journey. Reflecting on your accomplishments and challenges since then can be both nostalgic and empowering. Embrace the wisdom gained and the growth experienced over the years. As you navigate through life, remember that each chapter adds depth to your story, with 1993 being just the beginning of your remarkable narrative.

Born in 1993 How Old: A Look Back Through Time
Introduction
So, you’re curious about how old someone would be if they were born in 1993? Well, you’ve come to the right place! In this blog post, we’re going to take a journey through time to explore what it means to be born in 1993 and how old you would be in different years. Buckle up, because we’re about to embark on an exciting adventure!
Life in 1993
Let’s start by setting the stage for what life was like in 1993. It was a time when the world was experiencing significant cultural shifts, technological advancements, and memorable events. In 1993, Bill Clinton became the 42nd President of the United States, Jurassic Park dominated the box office, and Whitney Houston’s “I Will Always Love You” topped the music charts.
Popular Culture
The 90s were a vibrant time for popular culture, with iconic TV shows like “Friends” and “The Fresh Prince of Bel-Air” entertaining audiences. Cartoons such as “Animaniacs” and “Rugrats” captured the hearts of children around the world. If you were born in 1993, you would have grown up watching these shows and experiencing the magic of 90s nostalgia.
Technology
In 1993, the internet was in its infancy, with dial-up modems and floppy disks being the norm. Mobile phones were bulky and had limited functionalities compared to today’s sleek smartphones. Video game consoles like the Super Nintendo and Sega Genesis were all the rage, providing hours of entertainment for kids and adults alike.
How Old Would You Be In…
Now, let’s dive into the fun part – calculating how old someone born in 1993 would be in different years. It’s like taking a trip in a time machine to see how the passage of time affects our age.
In 2000
If you were born in 1993, you would have turned 7 years old in the year 2000. This was a time of excitement as the world entered a new millennium, and people around the globe celebrated the dawn of the 21st century.
In 2010
Fast forward to 2010, and someone born in 1993 would have celebrated their 17th birthday. This was a period of transition from adolescence to young adulthood, filled with new experiences, challenges, and opportunities for growth.
In 2020
In the year 2020, individuals born in 1993 would have turned 27 years old. This was a unique time marked by the global COVID-19 pandemic, which brought about significant changes to daily life and how we interacted with the world around us.
Reflections on Aging
As we contemplate the passage of time and how our age evolves with each passing year, it’s essential to embrace the journey of aging with grace and gratitude. Each year brings new experiences, lessons, and memories that shape who we are and how we perceive the world.
Embracing Growth
Growing older is a natural part of life, and it offers us the opportunity to learn, evolve, and become the best version of ourselves. Whether you’re turning 30, 40, or beyond, each age milestone represents a new chapter in your life story waiting to be written.
Celebrating Memories
Looking back on the years gone by, we can cherish the memories we’ve created, the friendships we’ve forged, and the challenges we’ve overcome. Age is not just a number; it’s a reflection of the richness of our experiences and the depth of our connections with others.
So, there you have it – a journey through time exploring what it means to be born in 1993 and how old you would be in different years. As we continue to navigate the twists and turns of life, let’s embrace each moment with gratitude and an open heart. Remember, age is just a number, but the memories and experiences we create along the way are what truly define us.
Which Generation were you born in?
Frequently Asked Questions
How old are individuals born in 1993 in [current year]?
As of the current year, individuals born in 1993 are typically [current year] – 1993 years old. You can calculate their age by subtracting the birth year (1993) from the current year.
When will individuals born in 1993 turn [specific age, e.g., 30]?
Individuals born in 1993 will turn [specific age] in the year 1993 + [specific age]. You can find out the year they will reach the desired age by adding the specific age to 1993.
At what age do individuals born in 1993 reach the legal age of adulthood?
Individuals born in 1993 reach the legal age of adulthood at the age of 18. This means that in the year they turn 18, they are considered legal adults in most countries.
Final Thoughts
Born in 1993? You are currently 28 years old. Time flies, and it’s incredible to see how quickly the years have passed since 1993. Reflecting on your life journey and accomplishments can be a great way to appreciate how far you’ve come. Cherish each moment and continue to create memorable experiences as you grow older. Born in 1993, how old you are today is a testament to the passage of time and the valuable lessons learned along the way.

Begin Your Pooper Scooper Business: How To Start A Pooper Scooper Business
Looking to start a pooper scooper business? The key is simple: meticulous planning and passion. Imagine a business where your love for animals meets entrepreneurial spirit. By following the right steps, you can turn this unique service into a thriving venture. From creating a solid business plan to marketing your services effectively, starting a pooper scooper business is an exciting opportunity waiting to be seized. It’s time to scoop up success!

How to Start a Pooper Scooper Business
Welcome to our ultimate guide on how to start a successful pooper scooper business! If you love dogs and don’t shy away from getting your hands dirty, starting a pooper scooper business can be a lucrative and rewarding venture. In this comprehensive guide, we will walk you through the essential steps and tips to get your pooper scooper business up and running smoothly.
Why Start a Pooper Scooper Business?
Before diving into the nitty-gritty details of starting a pooper scooper business, let’s discuss why this niche business can be a great opportunity for animal lovers and aspiring entrepreneurs alike. With the increasing number of pet owners seeking convenient solutions to keep their yards clean, a pooper scooper business addresses a common need in a fun and unique way.
1. Identify Your Target Market
One of the first steps in starting a pooper scooper business is identifying your target market. Consider who your potential customers are – busy pet owners, elderly individuals, or anyone looking to maintain a clean outdoor space. Understanding your target market will help you tailor your services and marketing strategies effectively.
2. Research Your Local Regulations
Before launching your pooper scooper business, it’s crucial to research and understand the local regulations regarding pet waste removal. Familiarize yourself with any licensing requirements, waste disposal regulations, and other legal considerations to ensure your business operates within the law.
Getting Started with Your Pooper Scooper Business
Now that you have a clear understanding of why starting a pooper scooper business is a great idea and have identified your target market, let’s delve into the practical steps to kickstart your entrepreneurial journey.
1. Create a Business Plan
Every successful business starts with a solid business plan. Outline your business goals, target market, services offered, pricing structure, marketing strategies, and financial projections in your business plan. A well-thought-out plan will serve as a roadmap for your pooper scooper business.
2. Invest in the Right Equipment
To provide efficient and reliable pet waste removal services, you’ll need the right equipment. Invest in durable pooper scoopers, waste bags, gloves, disinfectants, and a reliable mode of transportation. Having high-quality equipment will not only streamline your operations but also leave a positive impression on your clients.
3. Set Your Pricing Strategy
Determine how you will price your pooper scooper services. Consider factors such as the size of the yard, the number of pets, frequency of visits, and any additional services you offer. Research the pricing models of your competitors and set competitive yet profitable rates for your services.
Marketing Your Pooper Scooper Business
Effective marketing is essential to attract clients and grow your pooper scooper business. Here are some marketing strategies to promote your services and reach potential customers:
1. Create a Professional Website
Establishing a professional website for your pooper scooper business is crucial in today’s digital age. Include information about your services, pricing, contact details, and customer testimonials on your website. Optimize your website for local SEO to ensure it ranks high in search engine results when potential clients look for pet waste removal services in your area.
2. Utilize Social Media
Engage with pet owners and local communities on social media platforms like Facebook, Instagram, and Twitter. Share informative and engaging content related to pet care, cleanliness tips, and the benefits of hiring a pooper scooper service. Social media is a powerful tool to showcase your expertise and attract new clients.
3. Offer Promotions and Discounts
Attract new clients and encourage repeat business by offering promotions and discounts. Consider running special promotions for first-time customers, referral discounts, or seasonal deals to incentivize pet owners to try your services. Promotions can help generate buzz around your business and increase customer loyalty.
Providing Exceptional Customer Service
Delivering exceptional customer service is key to building a loyal customer base and growing your pooper scooper business. Here are some tips to provide top-notch service to your clients:
1. Be Reliable and Consistent
Establish a regular schedule for pet waste removal services and stick to it. Being reliable and consistent in your services will build trust with your clients and ensure their outdoor spaces are always clean and fresh. Communicate proactively with clients regarding any schedule changes or updates.
2. Maintain Professionalism
Interact with clients professionally and courteously at all times. Dress in a clean and professional manner, maintain a friendly demeanor, and address any client concerns promptly and effectively. Building a positive reputation for professionalism will set your pooper scooper business apart from the competition.
3. Ask for Feedback
Solicit feedback from your clients to continuously improve your services. Encourage clients to share their thoughts and suggestions on how you can enhance their experience. Act on constructive feedback to refine your operations and ensure customer satisfaction.
Expanding Your Pooper Scooper Business
As your pooper scooper business grows, you may consider expanding your services or scaling your operations. Here are some ideas to take your business to the next level:
1. Offer Additional Pet Care Services
Diversify your service offerings by providing additional pet care services such as dog walking, pet sitting, or grooming. Bundling services can attract more clients and increase your revenue streams. Ensure you have the necessary skills and resources to offer high-quality pet care services.
2. Hire Employees
If your workload becomes overwhelming, consider hiring employees to help with pet waste removal services. Hire reliable and trustworthy individuals who share your passion for animals and commitment to excellent customer service. Properly train your employees to uphold the standards of your pooper scooper business.
3. Expand to New Areas
Explore opportunities to expand your pooper scooper business to new neighborhoods or cities. Conduct market research to identify areas with a high demand for pet waste removal services and develop a strategic expansion plan. Growing your business into new territories can significantly increase your client base and profitability.
Congratulations! You are now equipped with the knowledge and insights to start and grow a successful pooper scooper business. By following the steps outlined in this guide, providing exceptional service, and staying dedicated to your passion for animals, you can build a thriving pet waste removal business that delights both pets and their owners.
How to Start a Pooper Scooper Business Step by Step: $0 to $100k/Year
Frequently Asked Questions
How can I start a pooper scooper business in my area?
To start a pooper scooper business, you first need to research the demand in your area. Create a business plan detailing your services, pricing, and target market. Obtain necessary licenses or permits, invest in quality equipment, and develop a marketing strategy to attract customers. Consistency, reliability, and excellent customer service will be key to building a successful pooper scooper business.
What equipment do I need to start a pooper scooper business?
Essential equipment for a pooper scooper business includes scoopers, disposable bags, gloves, disinfectant spray, and a reliable vehicle for transportation. Invest in durable tools that make the cleaning process efficient and hygienic. Additionally, consider providing your employees with uniforms and branded gear to enhance professionalism and credibility.
How can I attract customers to my pooper scooper business?
To attract customers to your pooper scooper business, focus on targeted marketing efforts. Utilize social media platforms, local advertising, and word-of-mouth referrals. Offer promotional deals for new clients or discounts for recurring services. Building a strong online presence through a professional website and positive customer reviews can also help establish credibility and attract more clients.
Final Thoughts
Starting a pooper scooper business requires planning, marketing, and dedication. Research your target market and set competitive prices. Utilize online platforms and social media to promote your services. Emphasize the convenience and benefits of hiring a pooper scooper service. Offer excellent customer service to build trust and loyalty. In conclusion, with the right approach and focus on how to start a pooper scooper business, you can turn this niche service into a successful venture.

How Many Ounces Is Tablespoon: Simple Conversion Guide
A tablespoon is equivalent to half an ounce. This conversion between tablespoons and ounces is a common query among home cooks and bakers looking to get their measurements just right. Understanding how many ounces are in a tablespoon can make a significant difference in the outcome of your recipes. Let’s delve further into this conversion to enhance your culinary precision.

How Many Ounces is a Tablespoon?
Welcome to our comprehensive guide on understanding the conversion of tablespoons to ounces. Whether you’re an aspiring chef or just someone who loves spending time in the kitchen, knowing how many ounces are in a tablespoon can make a big difference in your cooking adventures. Let’s dive in and explore this conversion together!
The Basics of Tablespoons and Ounces
Before we get into the nitty-gritty details, let’s start with the basics. A tablespoon is a unit of measurement commonly used in cooking to measure ingredients like spices, liquids, and more. On the other hand, an ounce is another unit of measurement that is often used in recipes to specify the amount of an ingredient needed. Understanding how these two units relate to each other can help you follow recipes more accurately.
Converting Tablespoons to Ounces
So, how many ounces are in a tablespoon? The answer is not as straightforward as you might think because it depends on what you are measuring. In general, there are 0.5 ounces in one tablespoon. This means that if a recipe calls for 2 tablespoons of a certain ingredient, you would need 1 ounce of that ingredient. However, it’s essential to remember that this conversion can vary depending on the density of the ingredient.
Fluid Ounces vs. Dry Ounces
When dealing with measurements in the kitchen, it’s crucial to distinguish between fluid ounces and dry ounces. Fluid ounces are used to measure liquids like water, milk, or oil, while dry ounces are used for ingredients like flour, sugar, or spices. Understanding this difference can help you accurately convert tablespoons to ounces based on the type of ingredient you are working with.
Practical Examples and Tips
Let’s walk through a couple of common cooking scenarios to give you a better idea of how tablespoons and ounces work together:
Example 1: Liquid Ingredients
If a recipe calls for 4 tablespoons of olive oil, you would need 2 fluid ounces of olive oil. This is because 1 tablespoon is equivalent to 0.5 fluid ounces. Keeping this conversion in mind can help you measure liquid ingredients accurately.
Example 2: Dry Ingredients
When dealing with dry ingredients like sugar, converting tablespoons to ounces can be slightly different. For example, if a recipe requires 8 tablespoons of sugar, you would need 4 dry ounces of sugar. This is because dry ingredients have a different density compared to liquids.
Helpful Tools for Conversions
Converting tablespoons to ounces can sometimes be tricky, especially when you’re working with complex recipes. Fortunately, there are many online conversion tools and mobile apps available that can help you quickly and accurately convert between different units of measurement. These tools can be incredibly handy in the kitchen and can save you time and effort.
Understanding how many ounces are in a tablespoon is a valuable skill for anyone who enjoys cooking or baking. By mastering this conversion, you can follow recipes with ease and ensure that your dishes turn out just right. Remember to consider the type of ingredient you’re working with, whether it’s a liquid or a dry ingredient, to accurately convert tablespoons to ounces. Happy cooking!
We hope this guide has been helpful in clarifying the conversion of tablespoons to ounces. Remember, practice makes perfect, so don’t be afraid to experiment in the kitchen and discover what works best for you. Stay tuned for more cooking tips and tricks in our upcoming articles!
Thank you for reading!
How Many Ounces In A Tablespoon
Frequently Asked Questions
How many ounces are in a tablespoon?
A tablespoon is equivalent to 0.5 ounces. It is a common unit of measurement used in cooking to provide accurate amounts of ingredients for recipes.
What is the conversion rate from tablespoons to ounces?
To convert tablespoons to ounces, you simply divide the number of tablespoons by 2. For example, 4 tablespoons would equal 2 ounces.
Can you provide a practical example of how to measure ounces using tablespoons?
If a recipe calls for 8 ounces of an ingredient and you need to measure it in tablespoons, you would require 16 tablespoons since 1 tablespoon is equal to 0.5 ounces.
Final Thoughts
In conclusion, it’s essential to know how many ounces a tablespoon holds. A tablespoon is equivalent to half an ounce, which is crucial for accurate cooking and baking. Understanding this conversion can greatly impact the outcome of your recipes. So, next time you’re in the kitchen, keep in mind how many ounces are in a tablespoon for precise measurements and successful culinary creations.